When talking virtually flowers, the rose is undoubtedly the symbol of dear. Roses are aesthetically pleasing to look at, just similar any other flower, they wither over time.
Why not learn how to draw a rose instead? With a rose drawing, you can appreciate its beauty upward close and personal endlessly.
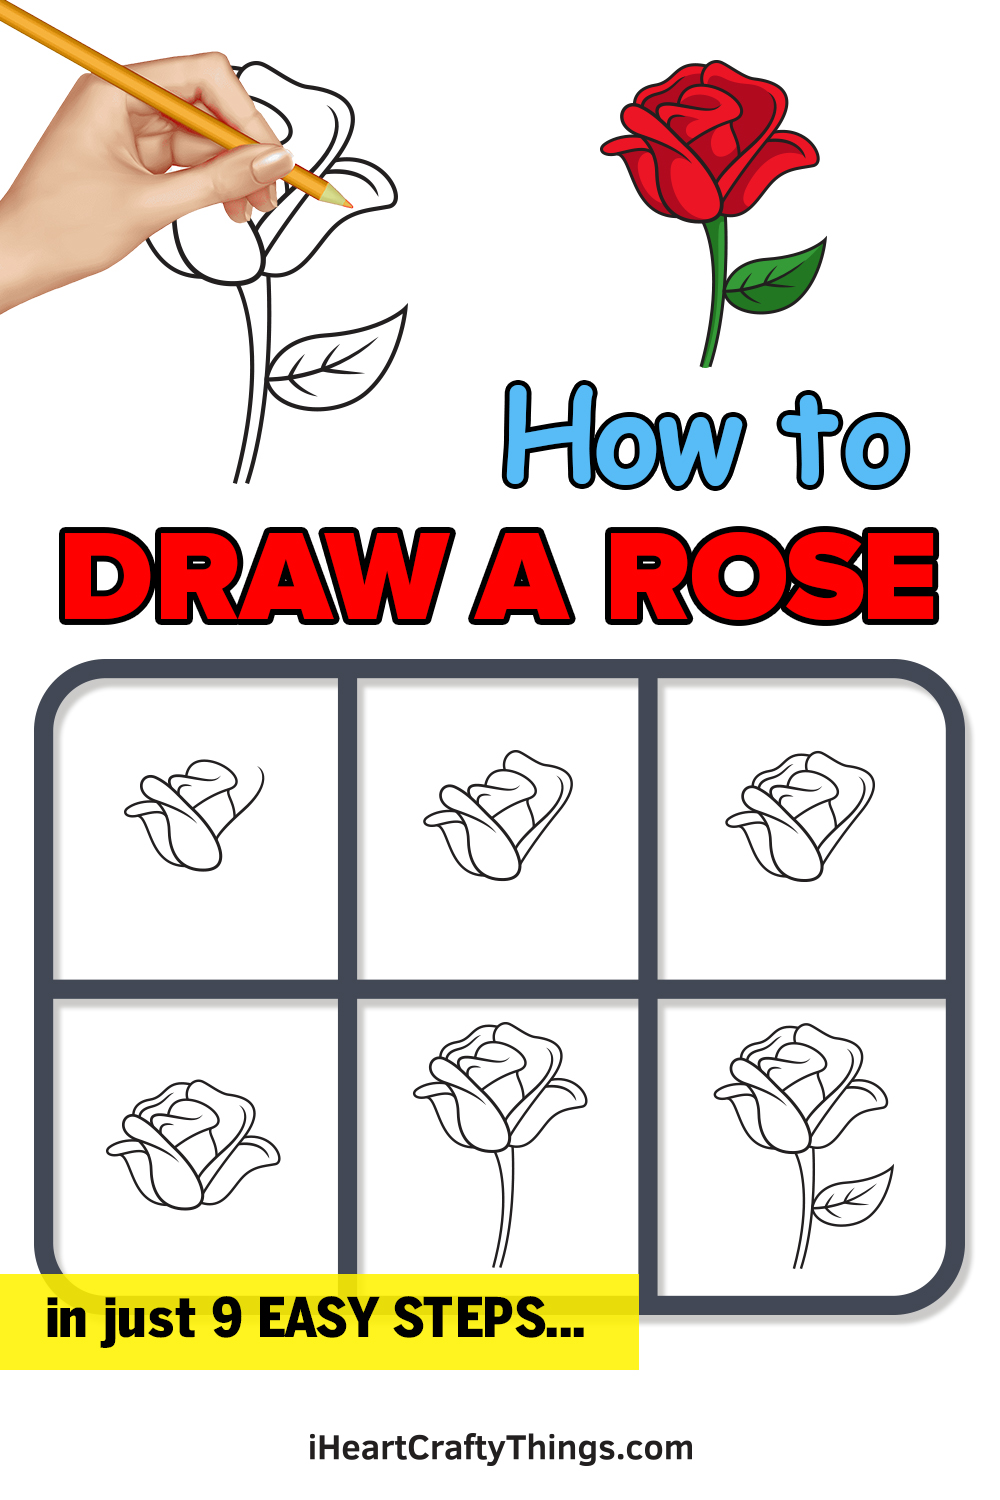
Fortunately, we accept created a stride-by-stride tutorial on how to draw a rose, summed up in 9 quick and easy steps.
Each instruction comes with an illustration to serve as your visual guide as you follow the steps one by one.
With the assistance of this guide, you can surely describe a rose whether you're a beginner or an proficient in drawing!
Take fun and employ your artistic skills to describe a beautiful rose!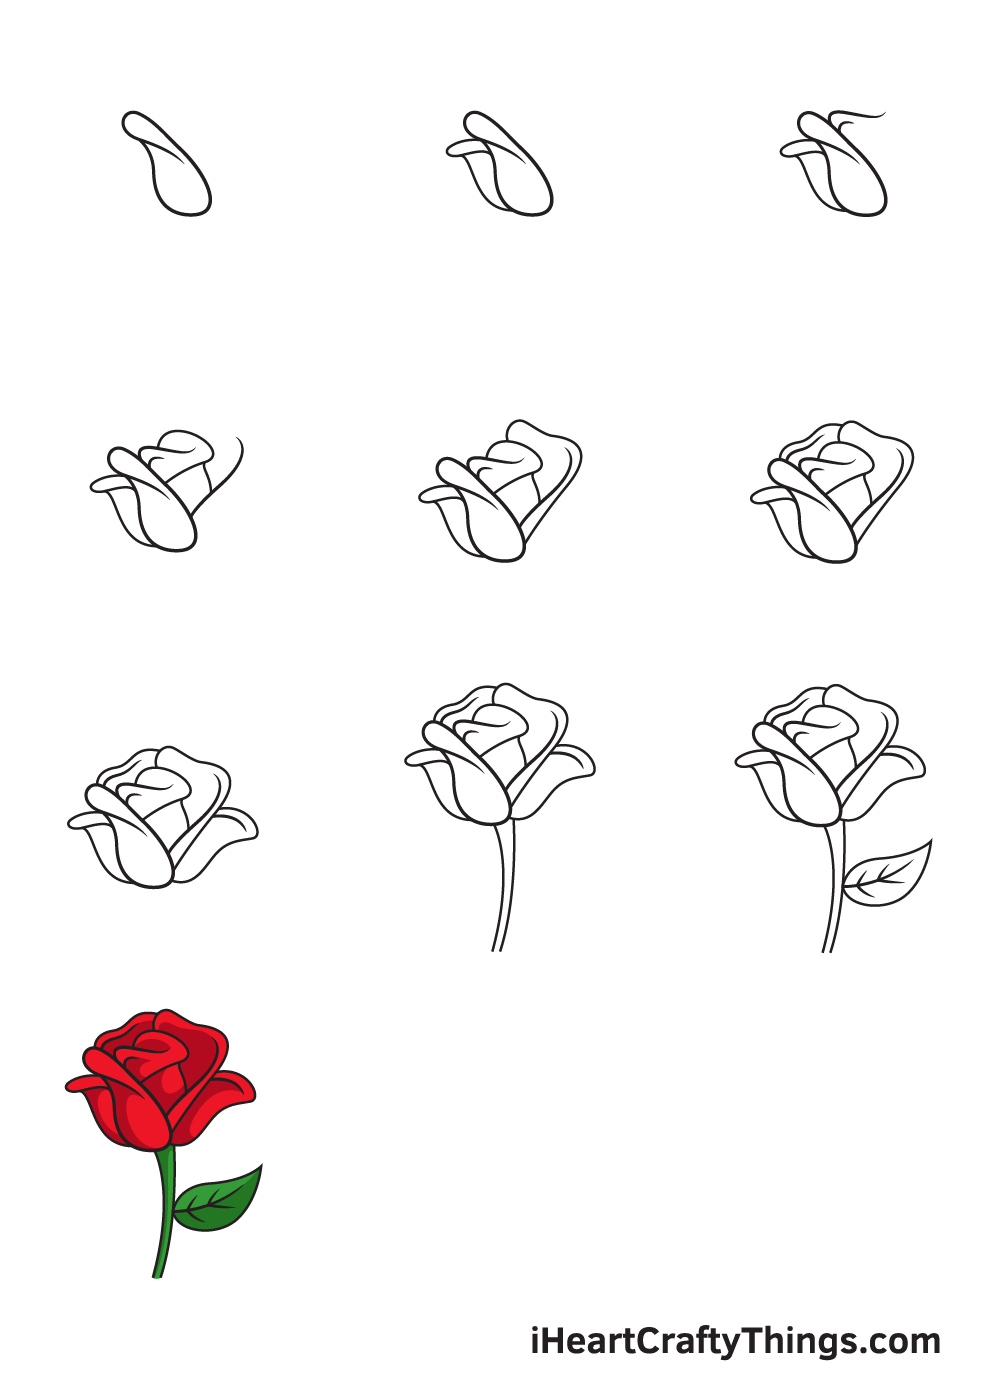
What'due south in this Blog Post
- How to Depict a Rose — Let'south go started!
- Pace 1
- Step 2 — Draw the First Two Petals of the Rose
- Step 3 — Next, Draw the Petal on the Back Function
- Stride four — At present, Draw the Middle Function of the Rose
- Step 5 — And then, Add More than Petals on the Right Side
- Footstep 6 — Add More than Rose Petals on the Back Function
- Step 7 — Complete All the Petals of the Rose
- Step 8 — Afterwards, Draw the Stem of the Rose
- Stride 9 — Now, Draw a Leafage on the Right Side
- Your Rose Drawing is Complete!
How to Draw a Rose — Let's get started!
Footstep 1
Start by drawing an irregular effigy that comprises curved lines on the upper left portion of your paper.
This forms the leftmost and the biggest visible petal of the rose.
Step 2 — Depict the Outset Two Petals of the Rose
Now, we will simply replicate what nosotros did in the previous step. This time, create a smaller petal figure behind the first petal we drew previously.
Don't worry if the petals don't expect identical! The petals don't necessarily have to be uniform. Equally a matter of fact, the more uneven the petals are, the more realistic they await!
Step three — Adjacent, Draw the Petal on the Back Function
This fourth dimension, nosotros volition be drawing the department of the inner petal.
Describe curved figures to represent this, as shown in the analogy.
Step four — At present, Draw the Middle Office of the Rose
This step is like the combination of the previous steps considering we will exist drawing parts of the inner petals and outer petals.
Draw curved lines to complete the inner petal and role of the outer petal.
Step five — Then, Add together More Petals on the Right Side
This time, nosotros will exist finalizing the department of the huge outer petal.
Draw curved lines to represent this, simply similar the one shown in the analogy.
Step 6 — Add More Rose Petals on the Back Function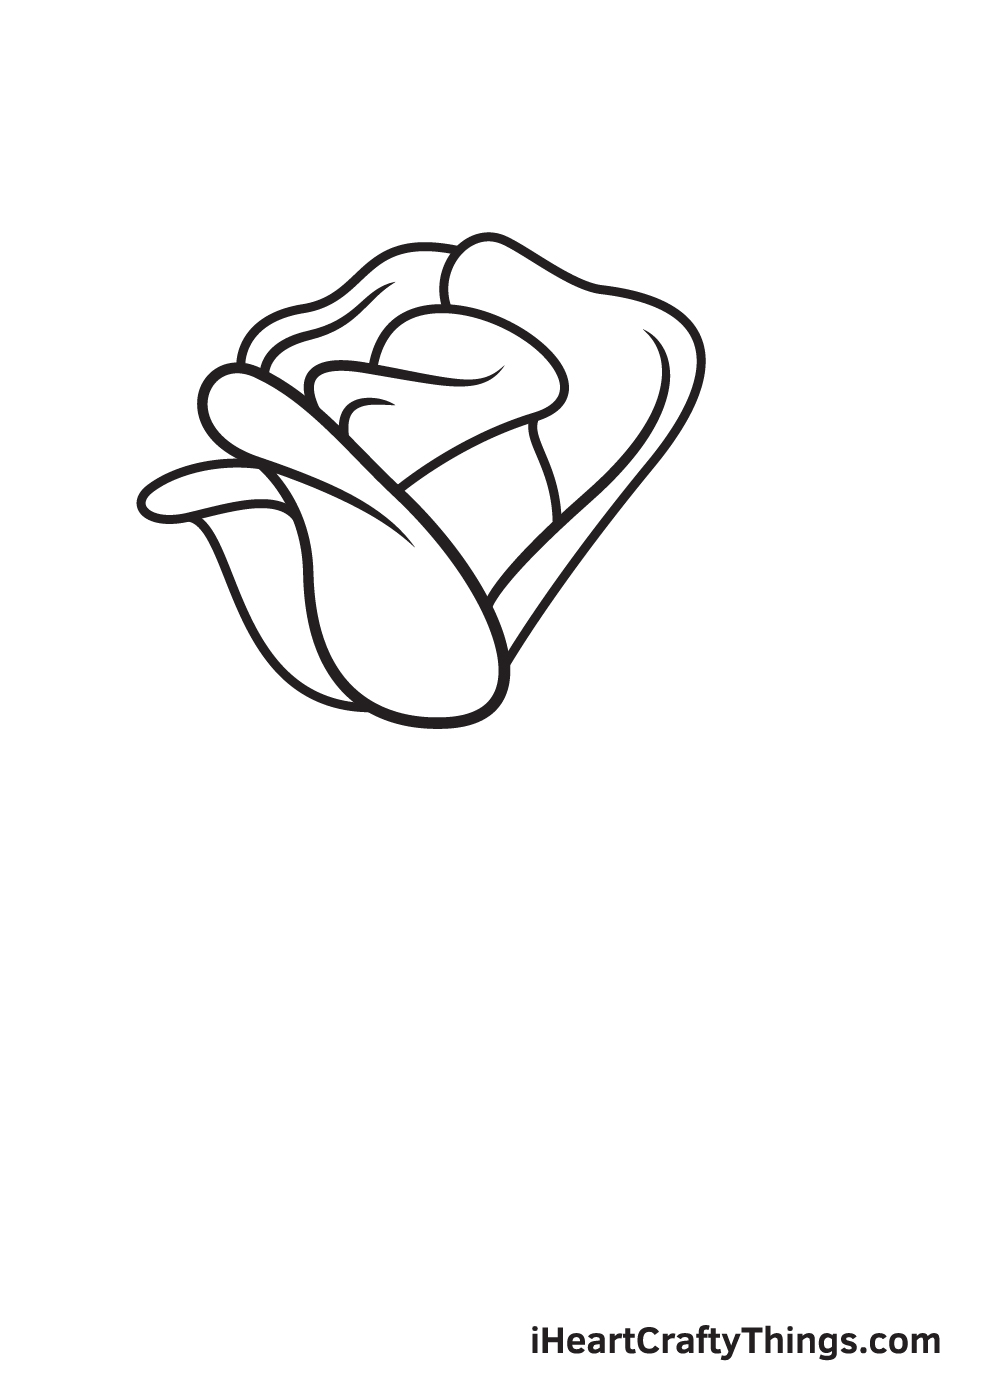
To complete the "wraparound" await of the petal, we will be drawing another petal. But since this petal is located at the back, only its top function would be visible.
To create this petal, simply describe a curved line forming the top edges of the petal.
Step vii — Complete All the Petals of the Rose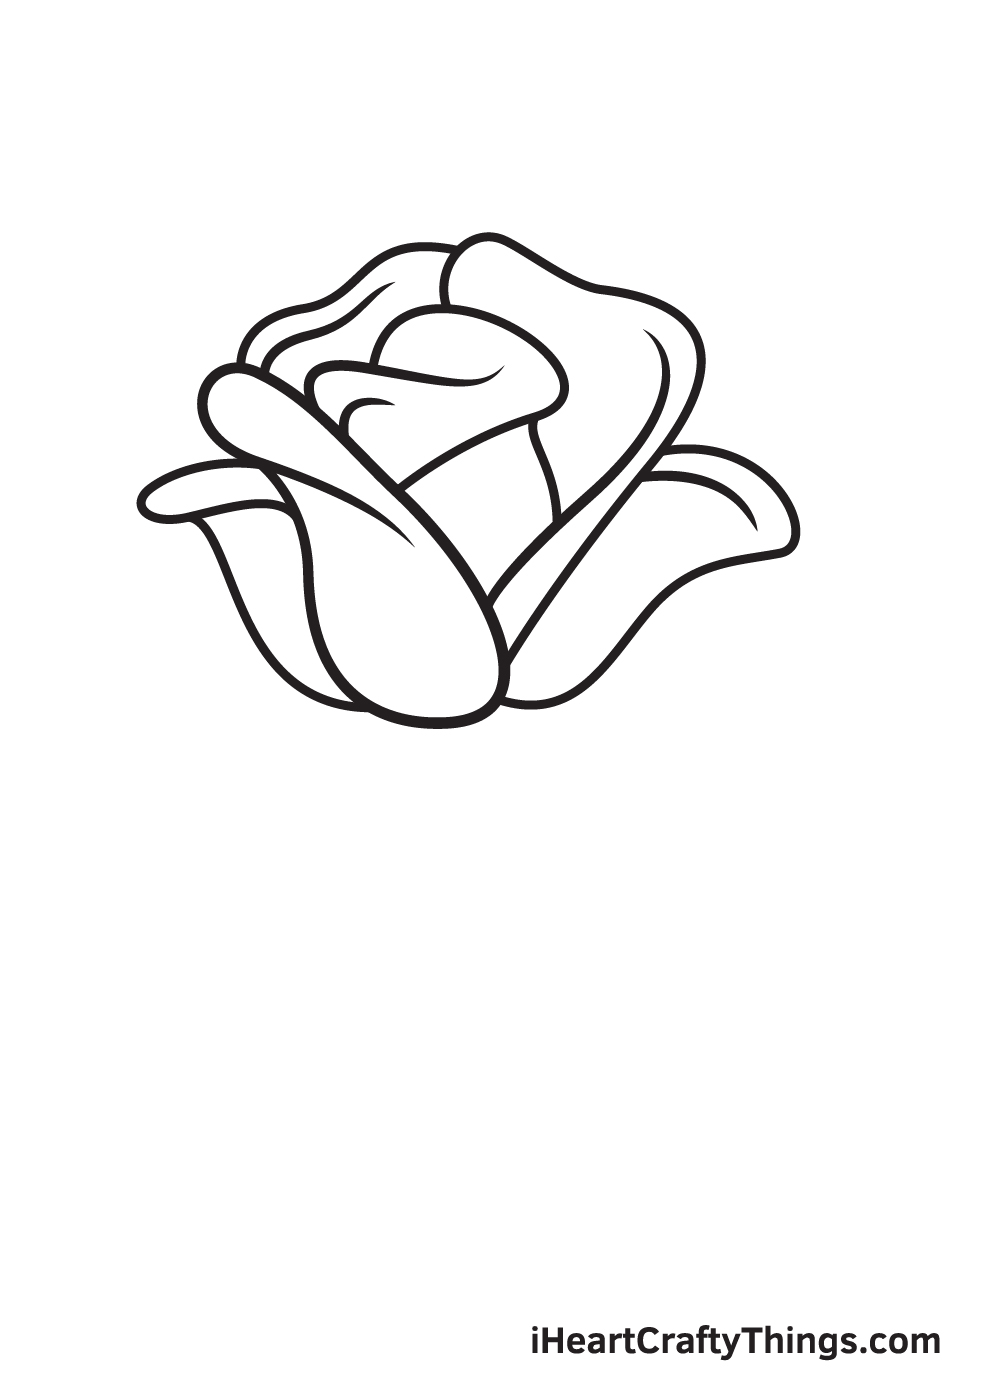
Create the final petal past cartoon some other curved figure on the rightmost side of the rose.
Since this petal is located on the outer role of the rose, this should exist more bended and curved compared to the other petals.
Stride 8 — Subsequently, Describe the Stem of the Rose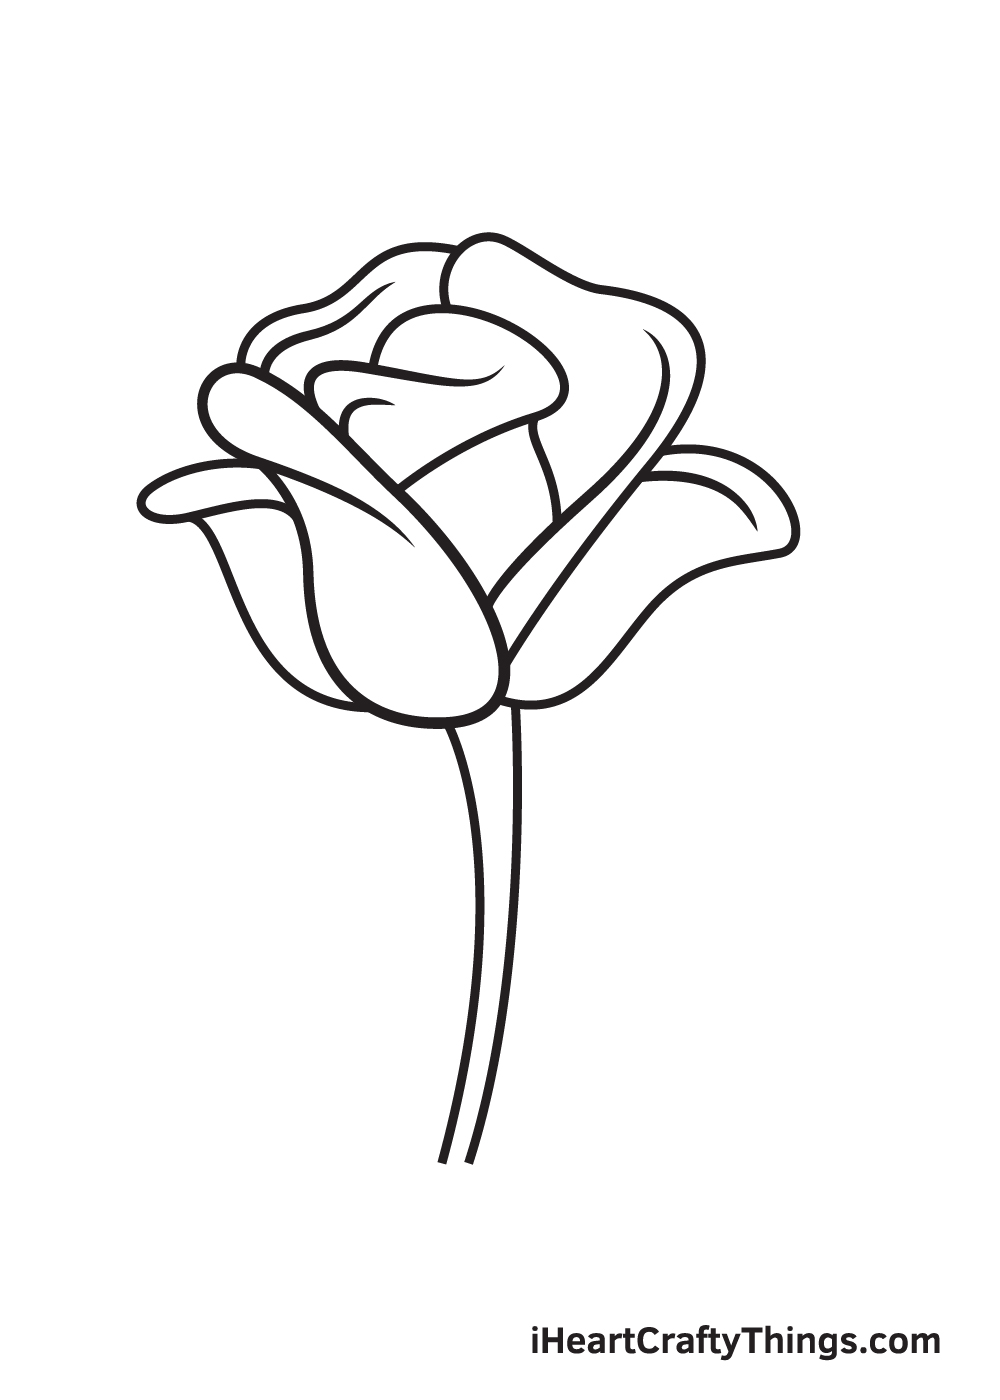
Now, we can see that the rose is gradually coming together!
In this step, nosotros volition be adding the stem of the rose. Simply describe 2 parallel curved lines right underneath the rose.
Step 9 — Now, Draw a Leaf on the Right Side
In this step, we will exist adding a unmarried leaf on the right side of the stalk of the rose.
Create the leaf past drawing an irregular shape with a round edge on the left side and a pointed end on the opposite side. This forms the shape of a single leafage.
Afterwards, draw a slightly curved line across the length of the leaf. This creates the middle line of the pattern on the leaf.
Then, depict multiple diagonal lines connected to the middle line to finalize the distinct patterns inside the leafage.
In that location yous take information technology—y'all have successfully drawn a rose! Now, information technology'due south finally time to put some color on your beautiful rose!
As you can encounter in the illustration higher up, we used the colour red for the petals and greenish for the stem and the leaves—a classic color combination for a rose!
Rose flowers exist in a wide range of colors, including cherry-red, pink, white, imperial, yellow, orange, and many more! You can opt to color the rose using its original colors or use an entirely different color. Either way, we're sure the colors will turn out beautifully!
How y'all volition color the rose is entirely upward to you! Accept fun playing with colors and picket equally the rose ultimately comes to life!
Your Rose Drawing is Consummate!
Hopefully, you had a fun drawing activity with this stride-by-step rose cartoon tutorial.
If you enjoyed drawing a rose, and then y'all might also be interested in drawing a daisy or other kinds of flowers! Which flower would you like to draw next time?
Call back, all of our drawing tutorials are 100% gratis for you to apply as references and materials for your cartoon activities.
We are regularly updating our "How to Draw" catalog, so don't forget to go on checking back to continuously enjoy brand-new drawing tutorials!
At present that you lot've successfully fatigued a rose, you should experience proud of yourself for finishing a masterpiece!
Make certain to take a photo of your artwork and share information technology on our Facebook folio and on Pinterest. Don't be shy—we're sure it looks awesome!
Nosotros're excited to see your stunning rose drawing.